- Matlab has a very good reference and help system in itself. To get started, these sections in Matlab documentations can be very helpful.
- "MatLab", "Image Processing Tool Box", and "Statistics Tool Box".
- This book can be very good if one is planning to use Matlab with image processing.
- Digital Image Processing (3rd Edition) by Rafael C. Gonzalez and Richard E. Woods
- To program in Matlab, there are two things to be aware of. First the program should be easy to understand. Second the program should be modulated. To achieve these two goals, listed below are a few programming tips.
- Use comments to explain the purpose or give a big picture of programs.
- Use meaningful variable names such that the program can be understood with little comments.
- Give each constant parameter a descriptive name.
- For example, write
- >> descriptive_name = 1;
- >> a_function(descriptive_name);
- but not,
- >> a_function(1);
Each function is designed to achieve one goal only.If two functions repeats simily works in part, extract that part to a function.Organize the functions and put them in a subfolder of the src/ directory.- Your directory tree will look like
- src/
- src/module1/
- src/module2/
- ...
Matlab has very good tools for debugging, testing and profiling. Please checkout these tools in Matlab and use them often. For convenient programming and testing, here are some more tips.- During initial programming/testing, we can write in one test script file. Then we use the cell mode to run only part of the programs for detecting and correcting errors.
- The values of the variables can be examined in you desktop by switching to workspace.
- If there is really some illusive error, we can use the debugging tool for further testing.
- After the initial testing is finished, each segment of the program will be extracted to a function.
- Test the function again to correct any errors.
Thursday, May 26, 2011
Getting started with Matlab
Sunday, February 6, 2011
Quick Start Guide on Using the Fluocell Image Tool
1. Double click and open MATLAB. After MATLAB is loaded, double click and open fluocell_image_tool.
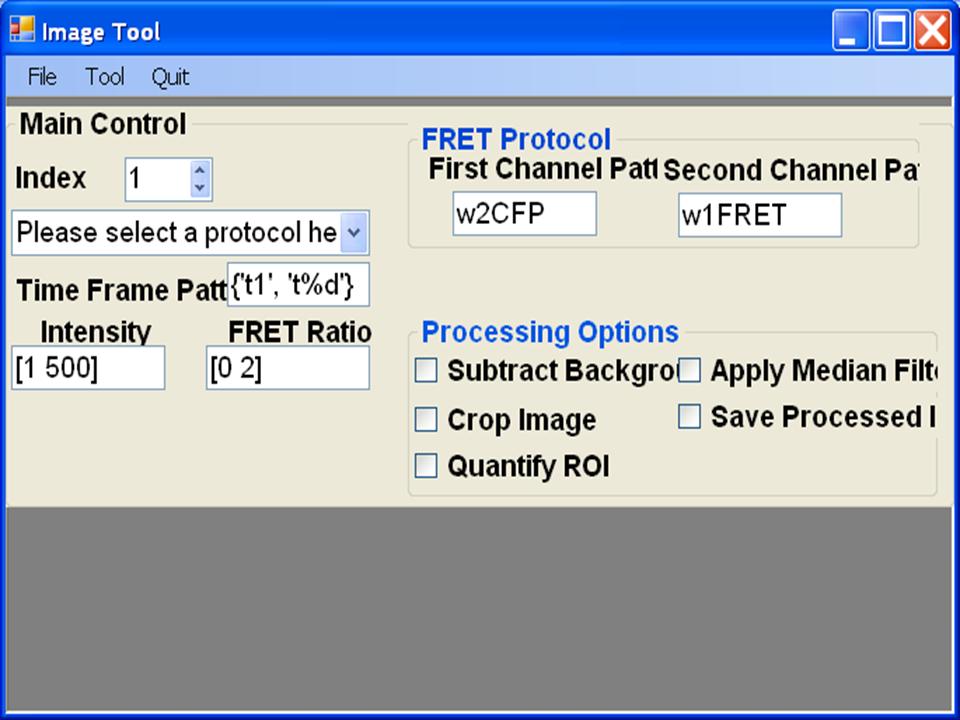
2. Select the FRET protocol.
3. Open the image files: File -> Open -> Navigate the image files -> Be sure to open the first CFP file among the list of files. There are options to subtract background and apply median filter. The intensity bound can be adjusted using the colormap editor by clicking the Figure menu: Edit -> Colormap. The figures can be copied by clicking Alt+Print Screen and pasted to a Microsoft PPT file. The processed FRET image can be saved by check the box “Save Processed Image”. Note once the FRET images are saved, the options Intensity and FRET ratio bound will become ineffective.
4. Simple quantification using regions of interest (ROIs). (1) Batch process: Tool -> Batch Update Image -> To process images from 1 to 10, set Image Index to [1:10] -> click ‘OK’ only once. (2) Copy the output variables from the MATLAB Workspace to Excel: fluocell_data -> time, fluocell_data -> value. The fluocell_data.time variable has two columns. The first column contains the index number of the image frames. The second column contains the time that the image frames were saved, in seconds starting from 12:00am of the day.
5. Close files and quit the image tool: File -> Close -> Quit.
6. The background, ROI and processed image files are saved in a subdirectory output/ within the image path. To remove and re-define these file, the user need to open the output/ folder and manually removed the saved file and repeat the image analysis steps.
Useful fluocell functions:
1. It is required that the image sequence of each cell is located in a separated folder. This function can be used to divide multiple position data into different folders: batch_sort_file_multiple_position(path, sub_dir).
Example:
>> path = 'E:\sof\fluocell_2.1\data\migration\07_01_2010\';
>> sub_dir = {'FN5\2_2\', 'FN5\2_3\', 'FN5\2_FBS10\', 'FN10\1\', 'FN20\1\'};
>> batch_sort_file_multiple_position (path, sub_dir)
2. Different types of regions of interest. By default, fluocell allows the user to choose a region of polygonal shape which is supplied by the user. There is an additional option to choose a circular region of a fixed diameter. This can be set up in MATLAB by
>> fluocell_data.roi_type = ‘circle with fixed diameter’;
>> fluocell_data.roi_diameter = 100;
If you want to switch back to a polygon region, simply remove the roi.mat file from the ourput/ folder and set:
>> fluocell_data.roi_type = ‘any’;
>> fluocell_data.roi_diameter = 0;
Frequent Asked Questions
1. What are the channel patterns and time frame pattern for the images obtained using software other than metamorph.
Answer: The channel patterns and time frame pattern are provided by the user to help Fluocell to recognize the donor and acceptor image files. The default values will work for the image files obtained from out Nikon microscope via metamorph. For example, the image files have the names such as fret11.001, fret11.002, …, fret12.001, fret12.002 etc.
The first channel pattern: fret11 ; the second channel pattern: fret12; the time frame pattern: {‘001’, ‘%03d’}. And the string ‘001’ should match the first donor image file that you click when opening the image.
Another example, if we have images obtained with Metafluo, with the following name pattern: cfp channel - 01.xxx, yfp channel - 01.xxx, DIC channel - 03.xxx; and images in the time sequence have the names xx.001, xx.002, ... and so on. Then fluocell can be setup to recognize these files by the following settings. First Channel Pattern : 01.0; Second Channel Pattern : 02.0; Third Channel Pattern : 03.0; Time Frame Pattern : {'001', '%03d'}.
Another example, if we have images obtained with Metafluo, with the following name pattern: cfp channel - 01.xxx, yfp channel - 01.xxx, DIC channel - 03.xxx; and images in the time sequence have the names xx.001, xx.002, ... and so on. Then fluocell can be setup to recognize these files by the following settings. First Channel Pattern : 01.0; Second Channel Pattern : 02.0; Third Channel Pattern : 03.0; Time Frame Pattern : {'001', '%03d'}.
2. The first images opened correctly, but Fluocell cannot navigate through the time sequence.
Answer: The Fluocell software use “time frame pattern” submitted by user to recognize file names and navigate through the time frame. For example, if the first image file has the pattern filename_t1.TIF, the software will replace ‘t1’ with ‘t2’, ‘t3’, ‘t4’ etc. But, if fret18_t1.TIF. In this case, Fluocell will think the next file in the time sequence as fret28_t2.TIF by replacing ‘t1’ in two places the file name. In order to fix this problem, the file name pattern need to be defined as {‘_t1’, ‘_t%d’} , so that Fluocell can correctly replace the unique pattern ‘_t1’ with ‘_t2’, ‘_t3’, ‘_t4’ etc.
3. Where is the executable file of image_tool?
Answer: The file is src\vb\image_tool\bin\Debug\image_tool.exe.
3. Where is the executable file of image_tool?
Answer: The file is src\vb\image_tool\bin\Debug\image_tool.exe.
Updates
1. The current version is fluocell-3.1.3.
2. patch_02_04_2011: updated the documentation, allowed the regions of interest to be a circular shape, fixed a bug which prevented the ratio images to be updated when intensity or ratio bound are changed.
To Do List
1. Save the ratio images inside the output folder.
1. Save the ratio images inside the output folder.
Saturday, February 5, 2011
Installation Instruction for fluocell_2.1 and fluocell_3.1 in MATLAB
To install fluocell3.1:
- File -> set path -> remove fluocell2.1 related paths except for E:\local\
- -> Add folder -> src\vb\mfun\, src\vis\, src\utility\, src\pre\, src\post\, src\detect\.
- -> Save for future sections.
- File -> set path ->remove fluocell3.1 related paths except for E:\local\
- -> Add with subfolders -> fluocell_2.1\contrib\colorspace\, fluocel_2.1\src\.
- -> Save for future sections.
Subscribe to:
Posts (Atom)